How to Create and Test Shopify Webhooks

Introduction
If you're building a Shopify app or integration, webhooks are one of the most powerful ways to react to store events in real time.
They allow you to receive notifications whenever something happens — like a new order, a product update, or a customer creation — without constantly polling the Shopify API.
In this guide, you'll learn how to:
- Understand what Shopify webhooks are and why they matter
- Subscribe to webhook topics
- Build a webhook handler using Node.js and Express
- Test and debug your webhooks locally
- Expose your localhost to the internet using Tunnelwise
Whether you're a junior or mid-level developer, this tutorial will help you confidently implement and test Shopify webhooks in your app.
What Is a Shopify Webhook?
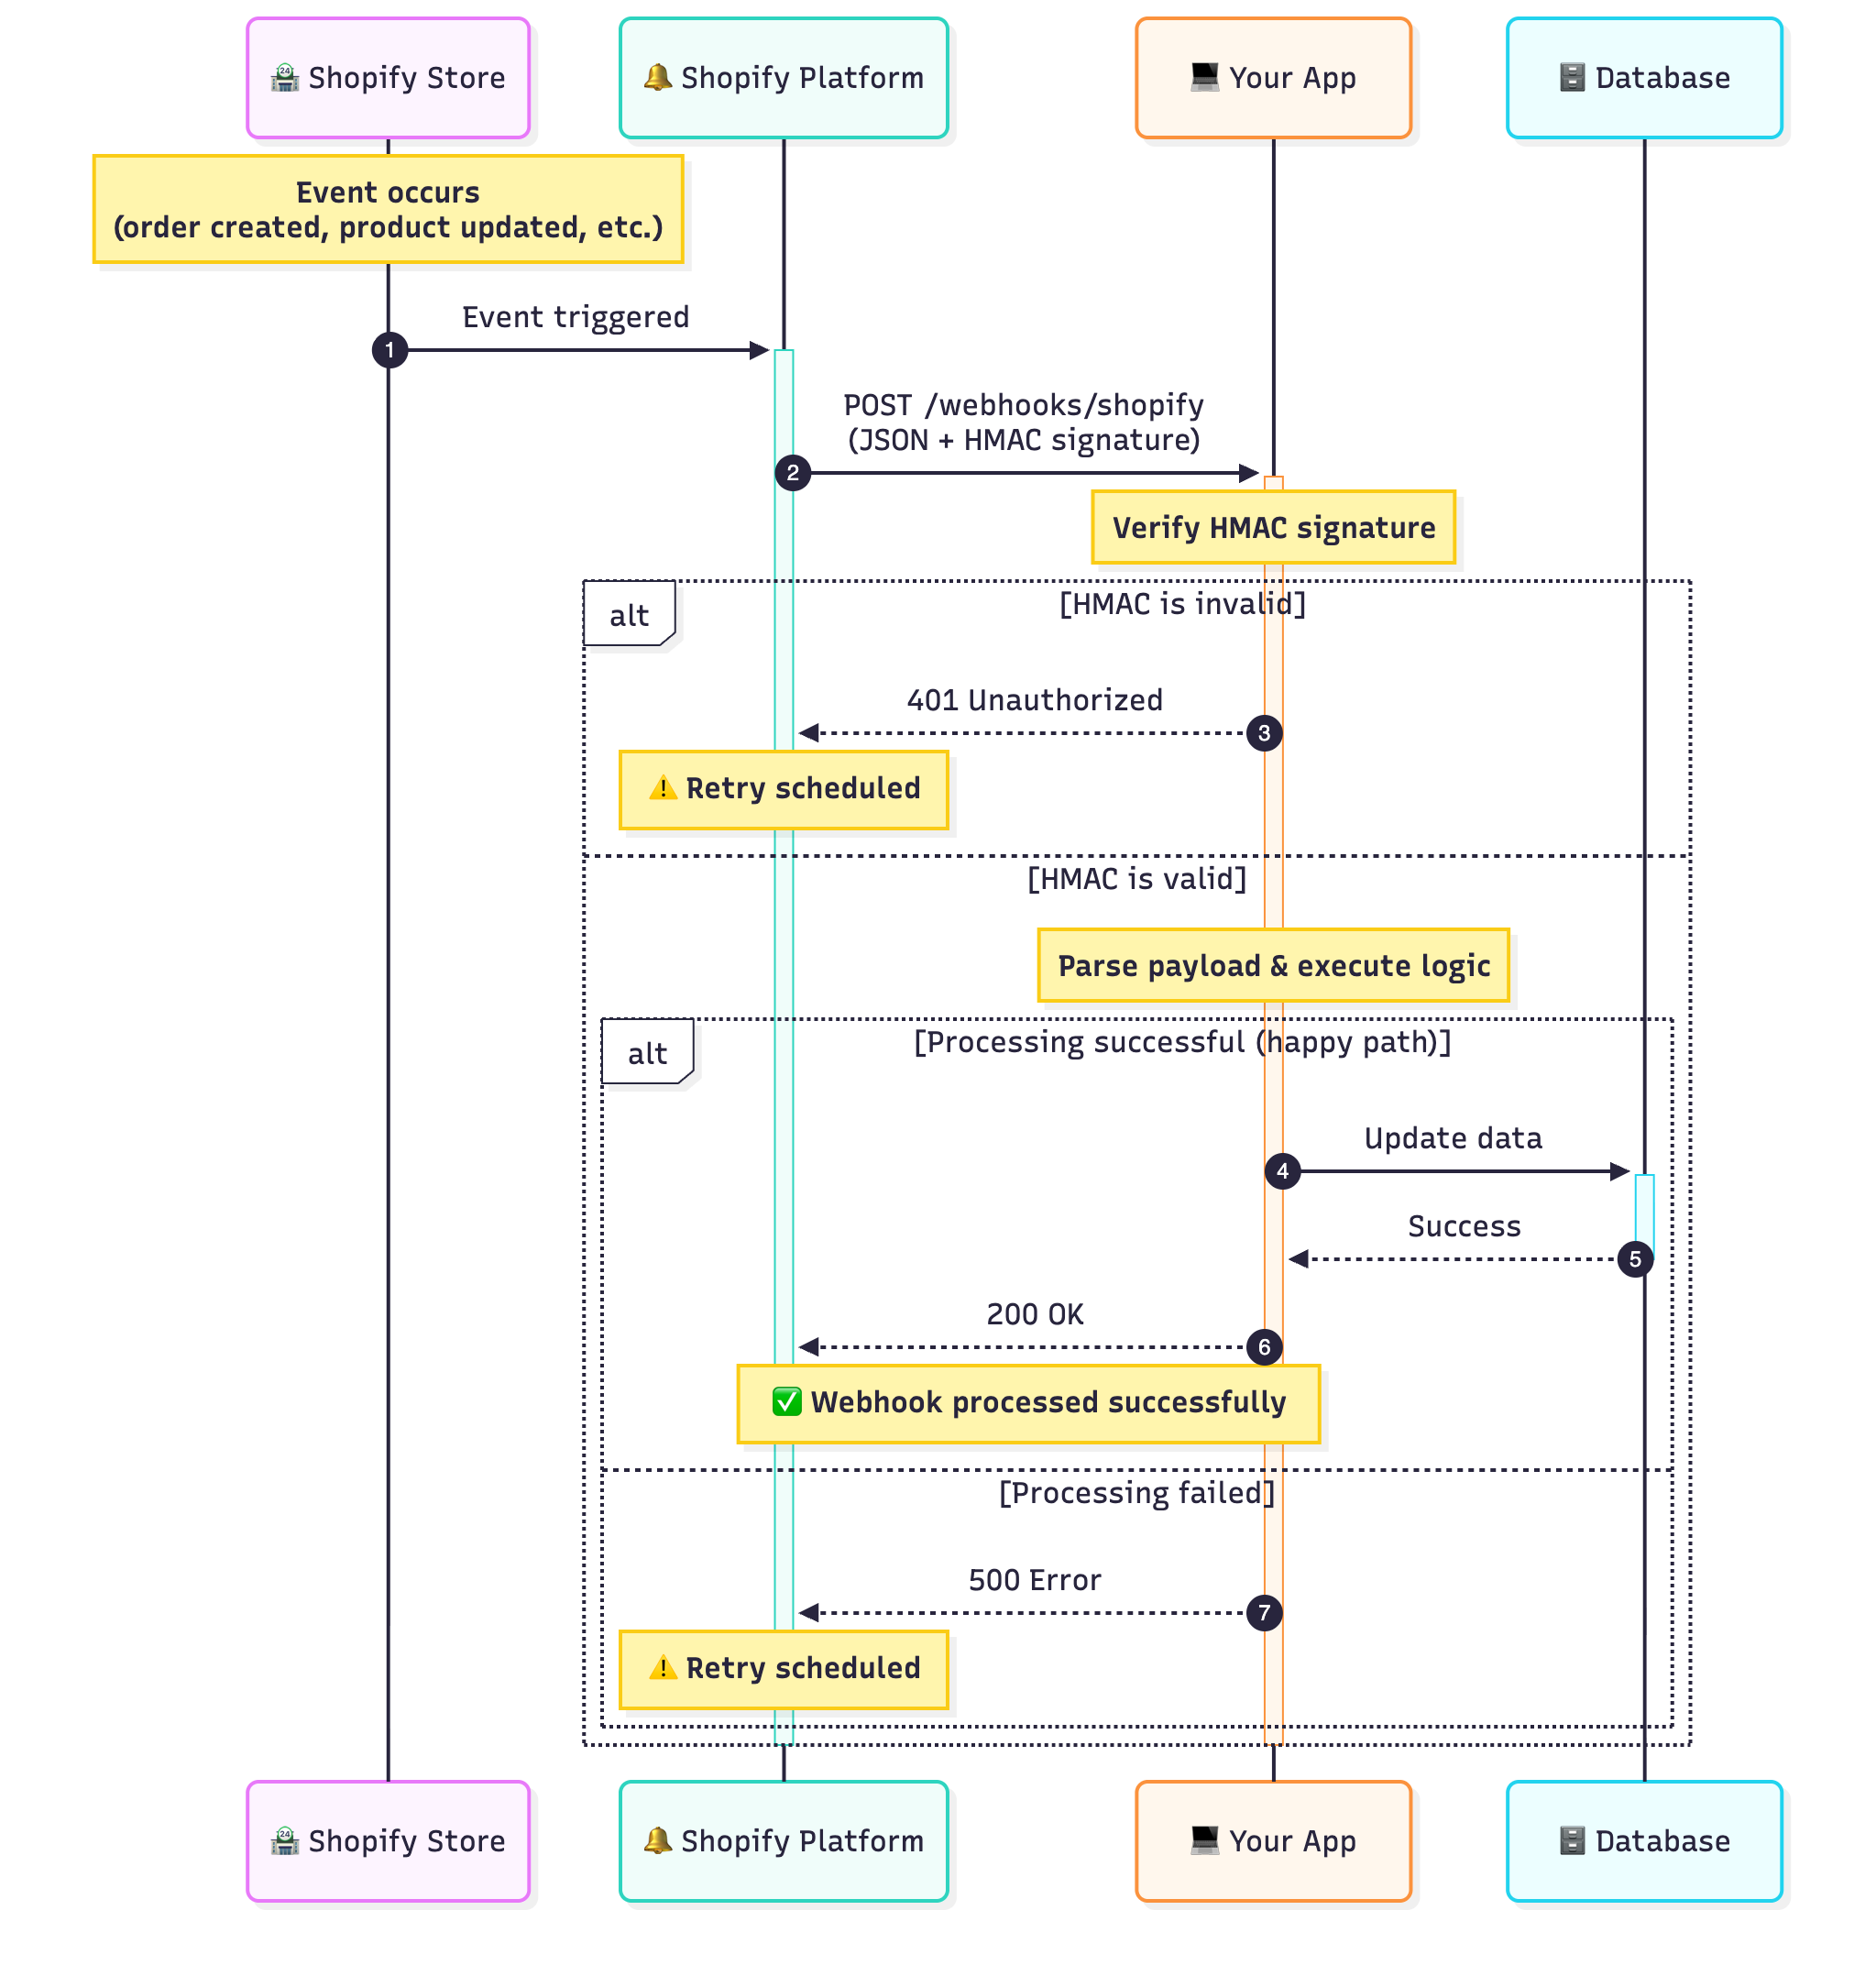
A Shopify webhook is an HTTP POST request that Shopify sends to your app whenever a specific event occurs in a store. Each event is called a topic — for example, orders/create, products/update, or customers/delete.
Instead of making periodic API calls to check for updates, webhooks let your app respond automatically in near real time.
📚 Official Docs:
When to Use Webhooks
| Use Case | Example Topics |
|---|---|
| Sync new orders to your ERP or fulfillment system | `orders/create`, `orders/paid`, `orders/fulfilled` |
| Update your inventory in an external database | `inventory_levels/update`, `inventory_items/update` |
| Track new or updated products | `products/create`, `products/update`, `products/delete` |
| Sync customer data with a CRM | `customers/create`, `customers/update`, `customers/delete` |
These events let you react to what happens in a Shopify store automatically, saving you time and API overhead.
How Webhooks Work (Under the Hood)
When a webhook event occurs:
- Shopify sends a POST request to the webhook URL you specify.
- The payload includes a JSON body with the event data.
- Shopify adds HTTP headers like:
X-Shopify-Topic: The event typeX-Shopify-Shop-Domain: The store's domainX-Shopify-Hmac-Sha256: A cryptographic signature for authenticity
- Your app must verify the HMAC to ensure the request is from Shopify.
- You process the event and return a
200 OKresponse.
If your endpoint is slow or fails, Shopify retries the webhook a few times before disabling it.
📖 Learn more: Troubleshooting failed deliveries
Creating a Webhook Subscription
There are three main ways to register a webhook in Shopify:
1. Through Your App Configuration (Shopify CLI)
If you're building with the Shopify CLI, you can define your webhooks inside your app configuration file (shopify.app.toml):
[webhooks]
api_version = "2025-07"

[[webhooks.subscriptions]]
topics = ["orders/create", "products/update"]
uri = "/webhooks/shopify"
Whenever the app is installed, Shopify automatically registers these subscriptions for each store.
2. Programmatically via the GraphQL Admin API
If you need dynamic subscriptions (for example, per shop), you can use the webhookSubscriptionCreate mutation:
mutation {
  webhookSubscriptionCreate(
    topic: ORDERS_CREATE
    webhookSubscription: { callbackUrl: "https://yourapp.com/webhooks/shopify", format: JSON }
  ) {
    webhookSubscription {
      id
      topic
    }
    userErrors {
      field
      message
    }
  }
}
GraphQL API Docs: webhookSubscriptionCreate
3. Manually in the Shopify Admin (for Testing)
You can also add webhooks directly from the Shopify Admin:
Settings → Notifications → Webhooks → Create webhook
This is handy for quick tests, though note that Shopify won't accept http://localhost URLs — you'll need a public HTTPS endpoint (we'll solve that with Tunnelwise later).
🧭 Shopify Help: Creating webhooks in the Admin
Building a Shopify Webhook Handler (Node.js + Express)
Let's walk through a simple, production-safe Node.js webhook handler.
1. Install dependencies
npm install express
2. Set up your Express server
// server.js
const express = require("express")
const crypto = require("crypto")

const app = express()

// Shopify sends JSON, but we need the raw body to verify HMAC
app.use("/webhooks/shopify", express.raw({ type: "application/json" }))

const SHOPIFY_SECRET = process.env.SHOPIFY_WEBHOOK_SECRET

function verifyHmac(req) {
  const hmacHeader = req.get("X-Shopify-Hmac-Sha256")
  const body = req.body
  const digest = crypto.createHmac("sha256", SHOPIFY_SECRET).update(body, "utf8").digest("base64")

  return crypto.timingSafeEqual(Buffer.from(digest, "utf8"), Buffer.from(hmacHeader, "utf8"))
}

app.post("/webhooks/shopify", (req, res) => {
  if (!verifyHmac(req)) {
    console.error("❌ Invalid webhook HMAC")
    return res.status(401).send("Invalid signature")
  }

  const topic = req.get("X-Shopify-Topic")
  const shop = req.get("X-Shopify-Shop-Domain")
  const payload = JSON.parse(req.body.toString("utf8"))

  console.log(`✅ Webhook received: ${topic} from ${shop}`)

  if (topic === "orders/create") {
    console.log(`New order ${payload.id} — Total: ${payload.total_price}`)
  }

  res.status(200).send("OK")
})

const PORT = 3000
app.listen(PORT, () => console.log(`Listening on port ${PORT}`))
3. Verify with Shopify Docs
📖 Verifying Webhook Authenticity
🧠 Webhook Security Best Practices
Testing Your Shopify Webhooks
Testing is one of the trickiest parts for new developers — especially when working locally.
Here's how you can reliably trigger, inspect, and debug Shopify webhooks.
1. Triggering Webhook Events
You can manually trigger events in several ways:
1.1. Create test data in your store
The simplest approach is to create actions that generate events:
- Create a new order (
orders/create) - Update a product (
products/update) - Add or edit a customer (
customers/update)
Each action will trigger the corresponding webhook.
1.2. Use Shopify's "Send test notification"
Navigate to:
Shopify Admin → Settings → Notifications → Webhooks
Select your webhook and click Send test notification
Shopify will send a sample payload to your endpoint instantly.
📘 Shopify Docs: Testing Webhooks in Admin
Use the Shopify CLI
If you're building with the Shopify CLI, you can send a test event:
shopify app webhook send \
--topic orders/create \
--address https://<your-url>/webhooks/shopify
This command uses a sample payload and authenticates automatically.
2. Checking Delivery Status in Shopify
Shopify provides built-in visibility for each webhook:
Shopify Admin → Settings → Notifications → Webhooks → Recent deliveries
You can:
- See timestamps of recent deliveries
- Inspect response codes (should be
200) - View payloads sent
- Retry failed webhooks manually
🧭 Shopify Docs: Monitor webhook deliveries
3. Inspecting Payloads Locally
In your Express server logs, you can log payloads for debugging:
console.log(JSON.stringify(payload, null, 2))
You'll see the raw JSON sent by Shopify.
For example, a simplified `orders/create` payload might look like:
{
  "id": 123456789,
  "email": "customer@example.com",
  "total_price": "89.99",
  "line_items": [{ "name": "T-Shirt", "quantity": 2, "price": "29.99" }]
}
4. Simulating Failures
Shopify automatically retries webhooks when your app returns a non-200 response.
To test this behavior, try responding with res.status(500).send('fail') temporarily — then check Shopify Admin to see the retry log.
🌐 Testing Locally with Tunnelwise
Shopify requires public HTTPS endpoints for webhooks — so it won't send to http://localhost:3000.
That's where Tunnelwise comes in handy.
Tunnelwise lets you share your local development server securely with a public HTTPS URL.
It's designed for macOS developers who want a one-click, no-monthly-subscription alternative to tools like ngrok.
🪄 How to Use Tunnelwise for Shopify Webhooks
1. Run your local server
node server.js
Your app is now listening on http://localhost:3000/webhooks/shopify.
2. Start Tunnelwise
Run Tunnelwise app and create a new tunnel or start the existing one for this service.
Once started, Tunnelwise will give you a public HTTPS URL, e.g.
https://green-hawk.tunnelwise.io.
3. Register your webhook
In Shopify Admin or API, set your webhook URL to:
https://green-hawk.tunnelwise.io/webhooks/shopify
4. Trigger test events
Create a test order or send a test notification.
Watch the requests hit your local console instantly.
5. Iterate quickly
You can edit your local code, restart the server, and test again — all without redeploying.
✨ Tunnelwise is great for any local webhook testing workflow — not just Shopify.
It works with any language, any framework, and keeps your testing private and fast.
🧭 Best Practices for Reliable Shopify Webhooks
To make your integration production-ready:
- Validate HMAC signatures — Always confirm authenticity.
- Return 200 quickly — Don't process heavy logic inline; queue jobs instead.
- Implement retries & idempotency — Webhooks may arrive more than once.
- Log deliveries — Keep track of received topics and timestamps.
- Secure your endpoints — Use HTTPS, authentication, and IP whitelisting if possible.
- Reconcile periodically — If you miss an event, use the REST or GraphQL API to fetch updates.
Final Thoughts
Webhooks are a powerful tool that let you react instantly to Shopify store events like orders, products, and customers. They eliminate the need for constant polling and enable your app to respond to changes in real time.
You can subscribe to webhook topics in multiple ways — whether through the GraphQL API for dynamic subscriptions, the Shopify CLI for configuration-based setups during development, or directly through the Shopify Admin panel for quick testing and manual management.
Building a secure webhook handler with Node.js and Express is straightforward, but always remember to validate HMAC signatures to ensure authenticity. Testing locally can be challenging since Shopify requires public HTTPS endpoints, but tools like Tunnelwise make it simple to expose your localhost securely without the need for complex setups or monthly subscriptions.
By following Shopify's best practices — such as returning 200 OK responses quickly, implementing idempotency, and reconciling data periodically — you'll build a reliable integration that scales with your business needs.