Setting up a WebSocket Server with Tunnelwise
How to run a Socket.IO server locally and expose it through a secure public URL using Tunnelwise, so you can test real-time features from any device.
A WebSocket connection doesn't start as a WebSocket. It starts as a regular HTTP request. The client sends an Upgrade header asking the server to switch protocols:
GET /socket HTTP/1.1
Host: example.com
Upgrade: websocket
Connection: Upgrade
Sec-WebSocket-Key: dGhlIHNhbXBsZSBub25jZQ==
Sec-WebSocket-Version: 13
If the server agrees, it responds with 101 Switching Protocols:
HTTP/1.1 101 Switching Protocols
Upgrade: websocket
Connection: Upgrade
Sec-WebSocket-Accept: s3pPLMBiTxaQ9kYGzzhZRbK+xOo=
After that handshake, the HTTP layer disappears entirely and both sides communicate using raw WebSocket frames — a lightweight binary protocol designed for full-duplex, low-latency messaging.
This matters for tunneling: a tunnel that only forwards HTTP traffic will handle the initial handshake but then drop the connection as soon as the upgrade happens. Tunnelwise handles the full lifecycle — the HTTP upgrade and the WebSocket frames that follow — so your local server is exposed transparently, with no changes needed on the server side.
This guide walks through building a minimal Socket.IO server, creating a tunnel for it, and verifying the connection using Tunnelwise's built-in request inspector.
Prerequisites
- Node.js 18 or later
- Tunnelwise installed on macOS
1. Build the WebSocket Server
Install the dependencies:
mkdir ws-server && cd ws-server
npm init -y
npm install socket.io
Create server.js:
// server.js
import { createServer } from "http"
import { Server } from "socket.io"

const httpServer = createServer((req, res) => {
  res.writeHead(200)
  res.end("ok")
})
const io = new Server(httpServer, {
  cors: { origin: "*" },
})

io.on("connection", (socket) => {
  console.log("client connected:", socket.id)

  socket.on("message", (data) => {
    io.emit("message", data) // broadcast to all clients
  })

  socket.on("disconnect", () => {
    console.log("client disconnected:", socket.id)
  })
})

httpServer.listen(3001, () => console.log("listening on :3001"))
Start the server:
node server.js
You should see listening on :3001 in the terminal. The server is now running locally but not reachable from outside your machine.
2. Create a Tunnel
Open Tunnelwise and click + Create new tunnel in the bottom-left corner.
Fill in the form:
- Tunnel name: anything descriptive — for example,
WebSocket 3001 - Local URL:
http://localhost:3001
Tunnelwise checks that the local URL is reachable before letting you proceed. Once your server is running, you'll see a green Success badge next to the URL field.

Click Create tunnel.
3. Start the Tunnel and Copy the Public URL
After creation, the tunnel appears in the sidebar in Stopped state. Tunnelwise has already assigned it a public URL — you can see it in the main panel before even starting it.
Click Start in the toolbar. The status badge changes to Connected.
Copy the public URL using the Copy URL button in the top-right. It will look like https://your-tunnel.tunnelwise.io. This is the URL your clients will connect to.
4. Connect a Client Through the Tunnel
Create a simple client page to test the connection. Save it as client.html and open it in a browser:
<!DOCTYPE html>
<html>
  <head>
    <title>WebSocket Test</title>
    <script src="https://cdn.socket.io/4.7.5/socket.io.min.js"></script>
  </head>
  <body>
    <input id="msg" placeholder="Type a message" />
    <button onclick="send()">Send</button>
    <ul id="log"></ul>

    <script>
      // Replace with your Tunnelwise public URL
      const socket = io("https://your-tunnel.tunnelwise.io")

      socket.on("connect", () => {
        log("connected: " + socket.id)
      })

      socket.on("message", (data) => {
        log("received: " + JSON.stringify(data))
      })

      function send() {
        const text = document.getElementById("msg").value
        socket.emit("message", { text, ts: Date.now() })
      }

      function log(msg) {
        const li = document.createElement("li")
        li.textContent = msg
        document.getElementById("log").appendChild(li)
      }
    </script>
  </body>
</html>
Replace https://your-tunnel.tunnelwise.io with the URL you copied in the previous step.
Open client.html in your browser. You should see connected: <socket-id> in the log. Type a message and click Send — it will be broadcast to all connected clients, including the same tab.
You can open the file on a different device (phone, tablet, another computer) by navigating to client.html hosted anywhere — or simply by opening the same file on another machine and pointing it at the same tunnel URL.
5. Inspect WebSocket Traffic
Tunnelwise logs every request that passes through the tunnel — including WebSocket frames. Switch to the tunnel in the sidebar and use the WS filter tab to see only WebSocket events.
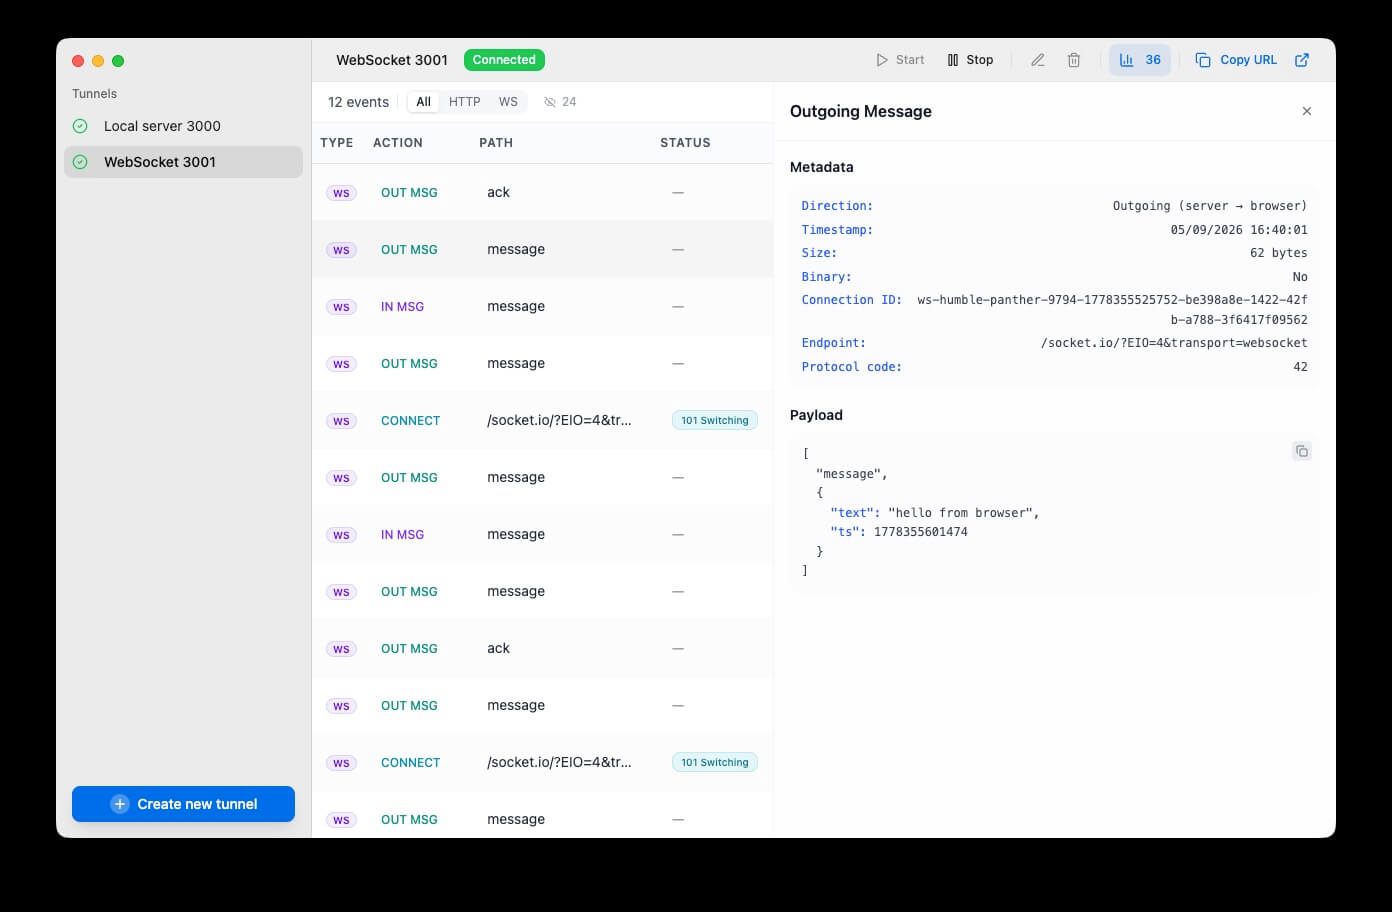
Each event shows:
- Type —
WSfor WebSocket frames - Action —
CONNECTfor the initial handshake,IN MSGfor messages from the client,OUT MSGfor messages from the server - Path — the Socket.IO endpoint (e.g.
/socket.io/?EIO=4&transport=websocket) - Status —
101 Switching Protocolsfor the upgrade, blank for messages
Click any event to open the detail panel. For messages, you'll see the full payload, direction (client → server or server → client), size, and a connection ID that ties frames to a specific socket.
This makes it straightforward to verify that your WebSocket handshake completed (look for a CONNECT event with status 101 Switching Protocols) and that messages are flowing in both directions.
Common Issues
The client connects but Socket.IO falls back to HTTP polling
Socket.IO tries WebSockets first and silently falls back to HTTP long-polling if the upgrade fails. Open the WS filter tab in Tunnelwise — if you see no CONNECT events with 101 Switching Protocols, the upgrade isn't happening.
Check the browser's Network tab and filter by WS to see the raw connection. If it's missing, Socket.IO likely fell back to polling. This can happen if the server's CORS configuration doesn't allow the tunnel origin — confirm that cors: { origin: "*" } (or your specific tunnel domain) is set on the server.
The tunnel shows "Connected" but the client can't reach it
Make sure the local server is still running (node server.js) before starting the tunnel. If you stopped and restarted the server, the port may have changed. Confirm the local URL in Tunnelwise matches the port your server is listening on.
wss:// vs ws://
Traffic through Tunnelwise is encrypted — always use wss:// when constructing WebSocket URLs manually. Socket.IO infers this automatically from the https:// scheme in the URL, but if you're using the native WebSocket API directly, make sure the protocol matches:
// ✅ correct — matches the https:// tunnel URL
const ws = new WebSocket("wss://your-tunnel.tunnelwise.io")
// ✅ also correct
const ws = new WebSocket("https://your-tunnel.tunnelwise.io")

// ❌ wrong — mixed content, browsers will block this
const ws = new WebSocket("ws://your-tunnel.tunnelwise.io")
// ❌ also wrong
const ws = new WebSocket("http://your-tunnel.tunnelwise.io")